Saturday, April 14, 2012

Quick and Easy Cupcake Toppers!


Do you need to whip out quick cupcake toppers? Try using candy melts on parchment paper.


1. Print out a template of your desired flat topper (Make sure your printout has multiples the correct size)
2. Melt your candy melts in a disposable piping bag
3. After candy melts are liquid, cut a tiny whole at the tip of your bag
4. Use template to trace out your desired topper on top of parchment paper.
5. Place parchment paper in the refrigerator.
6. After 20 minutes you will be ready to peal your toppers off using a spatula.
7. Place toppers on iced cupcakes
8. Get ready for praise...

Amazingly quick! Amazing cute!

Thursday, November 17, 2011

Having the right tools...The Turn Table!


In order to get a job done well, one must have the proper tools! This was a message taught daily growing up in my household. “You can achieve perfection with ease if you have the right tools, however you will have a difficult time if you are ill prepared” both my mother AND father would say. The older I get, the more I understand the seeds of brilliance they sowed.

A necessary tool for any artistic baker, who is attempting to achieve perfection, is a Turn Table.
3.
a rotating stand used in sculpture, metalwork, and ceramics.

Use this tool every time you are icing or decorating a cake and or cupcakes. It allows you to easily see 360 degrees, while getting to every cake destination. Place it on any sturdy flat surface, then place your cake on the top of the stand… and get to spinning! You may not be a real DJ, but your final product will create a heart song that will give you happy feet.

My turntable of choice is the Wilton White Rotating Cake Stand ~11 Inch Decorating Turntable/Cake Server

Now get to spinning!

Monday, November 14, 2011

All Things Luster Dust


All things Luster Dust!

One of my favorite things about being a girl… is the ability to indulge in the luster.
Luster: definition (dictionary.com)
1.
The state or quality of shining by reflecting light; glitter, sparkle, sheen, or gloss: the luster of satin.
3.
Radiant or luminous brightness; brilliance; radiance.
4.
Radiance of beauty, excellence, merit, distinction, or glory: achievements that add luster to one's name.

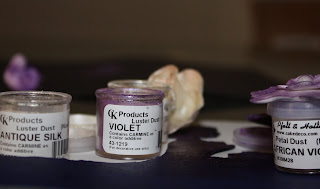
Luster dust is an edible pixie powder in a small container. A tiny application can have a major impact on your final work of art. It is the sparkle on the fine details that creates the wow factor we all look to achieve.

You should only apply luster dust to dry Fondant, Gum Paste, Modeling Chocolate, or Marzipan. If you are looking for a glitter, shine, or that special pop, it’s time to pick it up and put it to use. It can be the sheen on the outer petals of your flower, the bronzing affect on cherub’s cheeks, or a luminous gloss added on your entire cake.


So how do you use it? There are two different application methods I utilize.

Items Needed
1. Dry item that will be dusted
2. Food grade paint brush that is the size and shape needed
3. Luster Dust in the color of your choice (C&K or PFeil & Holding)

Luster Dust with no wet or dry additives
You can use many different size and style brushes, based on your desired outcome. Just like for painting or for makeup each brush can create a different look. Stroke the surface of the object, as if you were painting on the dust. Often the luster dust adheres to the surface as if painted on, but every now and then you may have to use application technique #2.

Items Needed
1. Dry item that will be dusted
2. Food grade paint brush that is the size and shape needed
3. Luster Dust in the color of your choice (C&K or PFeil & Holing)
4. Clear Alcohol based flavoring of your choice

Luster Dust with Alcohol based flavoring
In this method we utilize alcohol-based flavoring with the dust to literally paint on the luster dust. Again in your best painters stroke, apply the luster dust. The color under this method is more robust, but the luster is slightly lost in the sauce (literally).

So now you’ve got the decorating basics that can get your pieces poppin!

Sunday, April 25, 2010

Get a kick out of the crunch!


What’s the latest craze at Sweet Spot? Our textured icings. It’s not a visual thing… it’s an awakening of all your senses through catching you off guard. No matter what your flavor, nothing beats a little crunch. To accomplish this in your next super mom or dad cupcake venture, be sure to add several spoons of Sugar in the Raw… to give your icing a little something something. The kids love it… the adults can indulge in it, and it gives everyone an additional kick of happy.

Move it Move it… Cream Cheese Icing

Ingredients:
1 stick of Salted Sweetened Butter
1 8oz Bar of Cream Cheese
3 Cups of Powdered Sugar
3 Teaspoons of Heavy Whipped Cream
1 Teaspoon of Butterscotch Flavoring
3 Table Spoons of Sugar in the Raw

Directions:
Mix (Room Temperature), Cream Cheese, and 1 Cup of Powdered Sugar

Add a spoon of Heavy Whipped Cream with Every additional Cup of Powdered Sugar and Mix until desired consistency is achieved.

Mix in Flavoring

Add 3 Table Spoons of Sugar in the Raw and Mix for 60 Seconds

On the Mark, Get Set, GO GO GO!!!

  © Blogger template On The Road by Ourblogtemplates.com 2009

Back to TOP